Connecting your MailChimp account with GrazeCart allows you to acquire new subscribers and keep customer data in sync. Here is what the integration will let you do:
- Acquire subscribers during registration either automatically or with opt-in
- Use the newsletter content block
- Sync customer data and activity in GrazeCart with subscriber data in MailChimp
Step 1: Connect your MailChimp account
The first thing you will need to do is connect your MailChimp account using an API key. You can get your API key from your MailChimp admin. Follow these steps to set up:
- Log in to your MailChimp account.
- Navigate to Account > Extras > API Keys.
- Select an existing key (or create a new one) and copy the key to your clipboard.
- Go to your GrazeCart admin and navigate to Apps > Integrations > MailChimp.
- Paste in your API key and hit connect.
Make sure to keep your API key safes. Anyone with a key can access your MailChimp account.
Step 2: Select your subscriber list
The next step is to select the MailChimp list you want to sync with GrazeCart. This will probably be your main newsletter list, but it doesn't have to be. If you haven't created any lists yet, you can create one from your MailChimp dashboard. How to create a list in MailChimp.
If you are working off an existing list the chances are you already have a lot of subscribers. Later on in this guide you will learn about importing subscribers. As part of that import process you can select to update existing subscribers if you wish.
Step 3: Add list fields and webhook
- From the MailChimp integration page check "Add list fields" and "Add webhook"
- Click "Set-up checked items."
- Wait a few minutes and then verify they were created.
What are list fields?
List fields are what MailChimp uses to store information about a subscriber, like their name or last purchase date, and will allow you to send targeted and personalized emails. For example: you could send an email to only your subscribers that haven't purchased in the last 6 months.
What is a webhook?
The webhook allows MailChimp to send events back to GrazeCart. For example: when someone unsubscribes from one of your emails it will mark them as unsubscribed in GrazeCart as well. This is very important for keeping data in sync.
Step 4: Verify the list fields were added
Now we just want to verify that the list fields and webhook were added.
It will probably take a couple minutes for these to show up in MailChimp.
- Log into your MailChimp account
- Go to Lists and click the list you selected in step 2.
- Under settings select "List fields and *|MERGE|* tags."
- Verify that you see the fields listed below:
| Property | Merge Tag | Description |
|---|---|---|
| First Name | FNAME | Subscriber's first name |
| Last Name | LNAME | Subscriber's last name |
| Reminders | REMINDERS | Whether the customer should receive deadline reminders. Possible values: Yes, No |
| Role | ROLE | The role of the subscriber. Possible values: Admin, Staff, Customer, Lead |
| Postal code | POST_CODE | Subscriber's postal code |
| Address | ADDRESS | Subscriber's street address |
| City | CITY | Subscriber's city |
| State | STATE | Subscriber's state |
| Zip | ZIP_CODE | Subscriber's zip code (US only) |
| Country | COUNTRY | Subscriber's country |
| Referral Code | REF_CODE | Subscriber's referral code |
| Fulfillment ID | FF_ID | Subscriber's pickup location or delivery zone id. |
| Fulfillment Name | FF_NAME | Subscriber's pickup location or delivery zone name. |
| Credit | CREDIT | Subscriber's store credit |
| Is Active | IS_ACTIVE | Whether the Subscriber is active or not. Possible values: Yes, No |
| Last Purchase | LAST_PURCH | Subscriber's last purchase date |
| Orders | ORDERS | Subscriber's order count |
| Has Pickup | HAS_PICKUP | The date of the Subscriber's pickup if they have an order waiting. |
Step 5: Verify the webhook was added
- Log into your MailChimp account
- Go to Lists and click the list you selected in step 2.
- Under settings select "Webhooks"
- Verify that you see this webhook setup with the options below:
| Callback URL | https://yoursite.grazecart.com/webhooks/mailchimp |
| What type of updates should we send? |
|
| Only send updates when a change is made |
|
You can always manually add list fields and webhooks if you prefer.
Step 6: Sync existing customer data
You can export your customer data from GrazeCart as a csv file that can then be imported into MailChimp. This will let you sync your existing MailChimp subscriber profiles with your existing GrazeCart customers. You should only need to do this once.
You should only import customers that have agreed to be on your list.
- Go to Settings / Customers
- Change "Export Format" to MailChimp
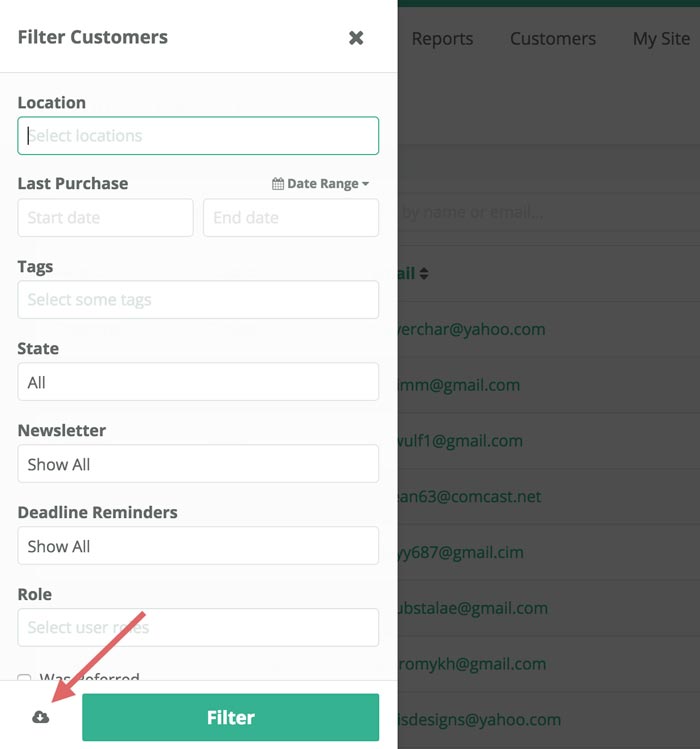
- Go to your customer index page
- Filter your customers down to those you want to export
- Click the export button
- Import your csv file into your MailChimp list

See MailChimp's documentation on how to import contacts.